Since our last tutorial on how to correctly color grade RED IPP2 footage in Premiere Pro we got a lot of emails from you guys asking for a tutorial how to do the same in DaVinci Resolve. So, without further ado, Let’s get into it. If you haven’t read our previous tutorial, I suggest you do so before reading this tutorial as some of the basic concepts of working in a wide gamut RGB color space are covered there and we won’t go into great detail here again.
Here’s a quick recap of the basic things you should know about IPP2.
REDWideGamutRGB
REDWideGamutRGB is a camera color space designed to encompass all colors a RED camera can generate without clipping. Essentially REDWideGamut is a standardised CameraRGB color space. Those of you who remember the days of the CameraRGB and are familiar with it, can think of the new color space from RED as CameraRGB albeit standardised.
This means RED is now using one color space rather than infinite number of color spaces differing upon the characteristics of the camera and the development settings of the raw information. This simplifies the workflow tremendously.
RED Log3G10
Log3G10 is a log curve specifically designed to encode camera data in REDWideGamutRGB color space for subsequent color grading and transformation to HDR, SDR or any other encodings.
Log3G10 is named for its key properties. The 3G represents the mapping of 18% mid grey to 1/3, and the 10 represents the extent of the log curve encoding a linear light value up to 10 stops above mid grey before the curve reaches an output value of 1.0.
The main benefits of the new IPP2 color pipeline from RED are easier color grading process and a much better compatibility with the HDR workflows.
Basic workflow in IPP2
Working with Log3G10 and REDWideGamutRGB is simple and greatly simplified.
- Process your RED footage into Log3G10 and REDWideGamutRGB. This ensures no clipping occurs to the colors coming from the sensor as REDWideGamutRGB can encompass all colors coming from a RED camera.
- Grade in this wide gamut log space.
- Apply appropriate viewing conversion at the end of your pipeline.
DaVinci Resolve and IPP2
DaVinci Resolve was one of the first software to support RED’s IPP2 workflow, and there are many ways in DaVinci Resolve you can treat your footage as IPP2. No matter which route you decide to go, you should make sure that conversion from REDWideGamutRGB and Log3G10 into Rec709, or any other viewing color space for that matter (P3 for example or Rec2020), happens at the very end of your color grading pipeline.
Personally I prefer to make the conversion into Rec709 on the last node in DaVinci Resolve but you could also use the Color Management tab in the project settings. Again, I suggest you read our previous tutorial to understand better why it’s important to make all your color grading decisions in REDWideGamutRGB and convert into Rec709 at the very end.
Doing it right
Please have a look at this short video tutorial explaining how to work with IPP2 footage in DaVinci Resolve.
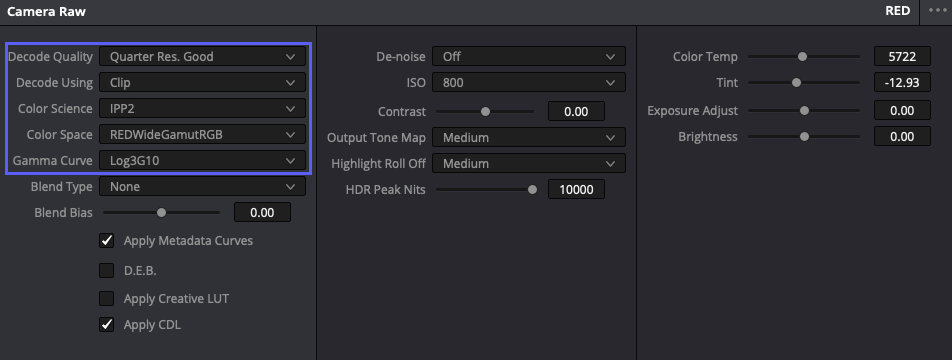
So the very first step we need to get right is to make sure we’re interpreting our RED footage as IPP2. To do so, go into Camera Tab and select the following:
Decode Quality: Whichever quality your machine can cope with
Decode Using: Clip – this will allow you to decide on Decode settings on a per clip basis
Color Science: IPP2
Color Space: REDWideGamutRGB
Gamma Curve: Log3G10
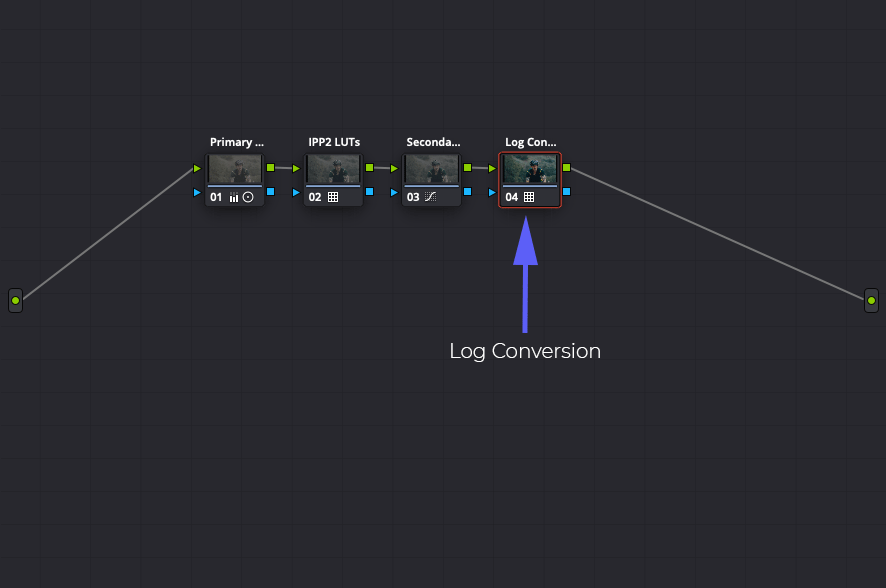
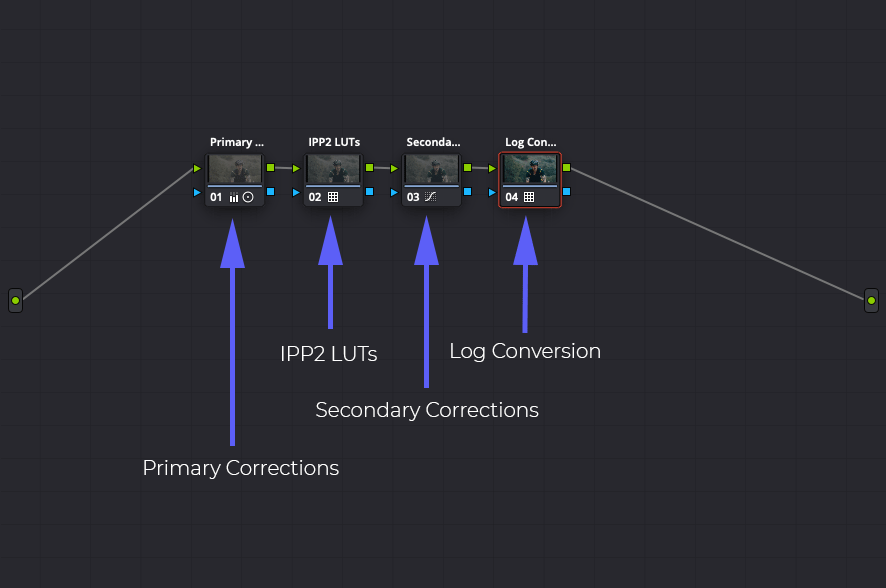
Next we will create 4 serial nodes in total. When using serial nodes, they are applied in a serial fashion, meaning one is applied after the other and each serial node is “fed” with the result of previous serial nodes. Our node tree would look something like this:
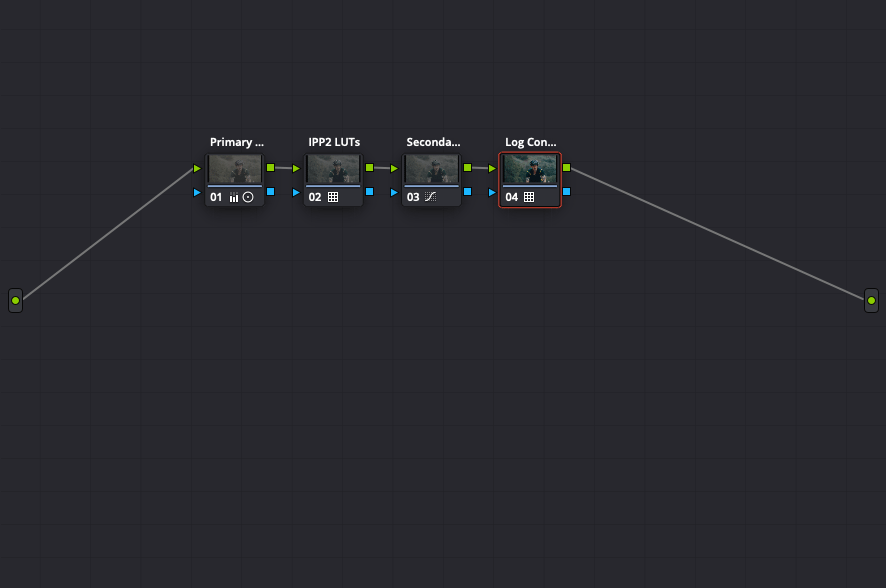
To better understand how serial nodes work, let’s have a look at our node tree above and see what’s going on there. Node No.1 will be applied first to our untouched original footage. The footage, with the color edits from node No.1 will be transferred onto node No.2. Node No.2 is fed with our original footage + the color edits from node No.1. Therefore, the source that node No.2 works with is different from the source node No.1 works with as it includes the color edits from node No.1. Node No.3 is fed with original footage + color edits from node No.1 + color edits from node No.2. And so forth.
As our footage was interpreted as IPP2 namely REDWideGamutRGB Log3G10 in the very first step we did, that is the source footage that is fed into node No.1. Knowing this, we understand that whatever happens on nodes before the node onto which we will apply our viewing log conversion is working directly with our IPP2 footage and whatever happens on nodes after log conversion is applied, is effectively taking place in Rec709 (or whichever color space we chose for our log conversion).
Back to our node tree, we want to apply our log conversion into Rec709 at the end of our pipeline. So how do we do that? We simply apply a log conversion LUT, from REDWideGamutRGB Log3G10 into Rec709 (or any other color space) on the last serial node and make all of our corrections before that conversion takes place. Let’s have a look again at our node tree. As you can see, log conversion is applied last.
So what do the rest of the nodes do?
Node No.1 – should be reserved for primary corrections such as white balance, exposure, contrast, etc.
Node No.2 – should be reserved for a creative LUT, if using LUTs in your workflow. Now I should mention, that if you are using LUTs in your workflow to color grade your footage, these must be IPP2 tailored LUTs as we are applying them directly on the REDWideGamutRGB Log3G10 footage. You cannot use Rec709 LUTs here as the result will look very different from the expected outcome. If you are using our LUTs, this is not an issue since we offer IPP2 tailored LUTs in our Professional package and you would simply use the LUTs from the IPP2 folder.
Node No.3 – should be reserved for secondary corrections such as HSL or any other color grading decisions that should take place after you’ve applied the creative LUT on layer 2.
Node No.4 – as mentioned should be reserved for conversion into Rec709, P3, Rec2020 or any other color space.
Obviously, you may want to have more or less nodes depending on your needs but having our grade organised in this way ensures all of our color grading decisions take place directly in the REDWideGamutRGB space which means we can safely change the conversion at the end of our pipeline and benefit from not having to re-grade the footage when changing output among other obvious benefits of working in a wide standardised color space.
To take your color grading game one step forward we suggest to use our LUTs Previewer to quickly preview, mix and match different LUTs to decide on and create your look. If you’re still unfamiliar with our revolutionary LUTs Previewer, here’s a quick preview of this wonderful tool.
We hope you enjoyed this tutorial and that you’ve learned something new that will further improve your color grading game. We would love to hear back from you in comments down below what you think of this workflow.
As always, should you have any questions please contact us.